
Challenger garage door opener troubleshooting starts with the LED diagnostic lights on the motor unit. Most Challenger problems — door not moving, remote not working, door reversing before closing — are fixable in under 15 minutes without calling a technician. This guide covers every common failure by symptom, with the LED code that points to each one.
Short Answer: Check the LED lights on the Challenger motor unit first. A fast-flashing green LED means sensor obstruction. A fast-flashing red LED means contact reverse or wiring short. A slow-flashing red LED means a stuck relay. For remote issues, replace the battery first, then check that the radio coding switches match between the remote and the motor unit.
Read the LED Diagnostic Lights First
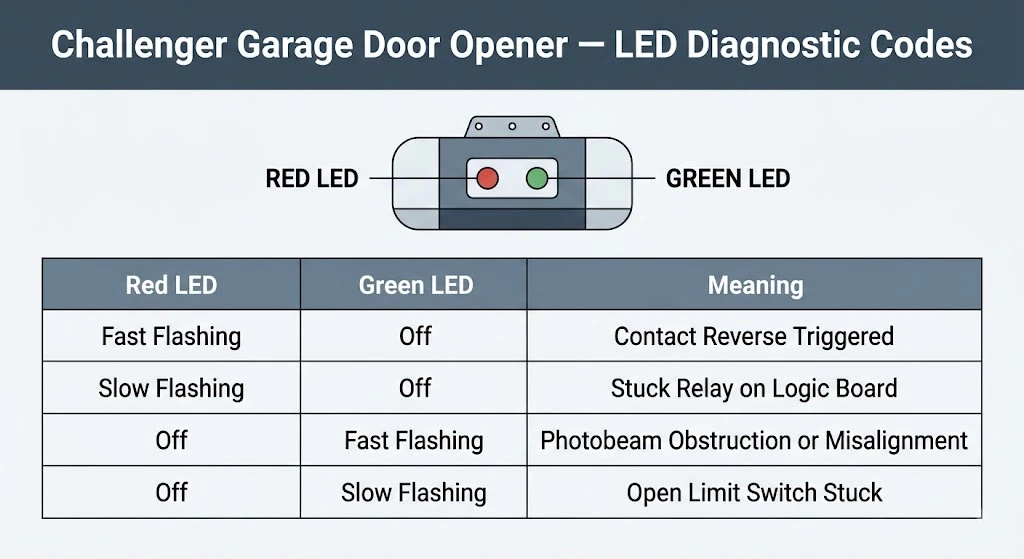
The Challenger 9300 series motor unit has two LEDs — red and green — that tell you exactly what is wrong before you touch anything else. Check them before attempting any fix. They save you from replacing parts that are not the problem.
| Red LED | Green LED | Meaning | Action |
|---|---|---|---|
| Off | Off | Normal operation | No action needed |
| On steady | Off | Learn mode active or memory full | Wait 25 seconds; if full, erase remotes |
| Fast flashing | Off | Contact reverse triggered | Check for obstruction, inspect wiring |
| Slow flashing | Off | Stuck relay on logic board | Power cycle; if persists, replace board |
| Short fast blink | Off | RF signal received | Normal — remote is communicating |
| Off | Fast flashing | Photobeam obstruction or misalignment | Clear sensor path, realign sensors |
| Off | Slow flashing | Open limit switch stuck | Adjust up-travel limit screw |
| On steady | Off | Shorted wall button or wiring | Disconnect wall button wires, test |
Check for obstruction and inspect wiring near the motor unit.
Clear the sensor path and realign both photo-eye sensors.
Learn mode is active, or the remote memory is full.
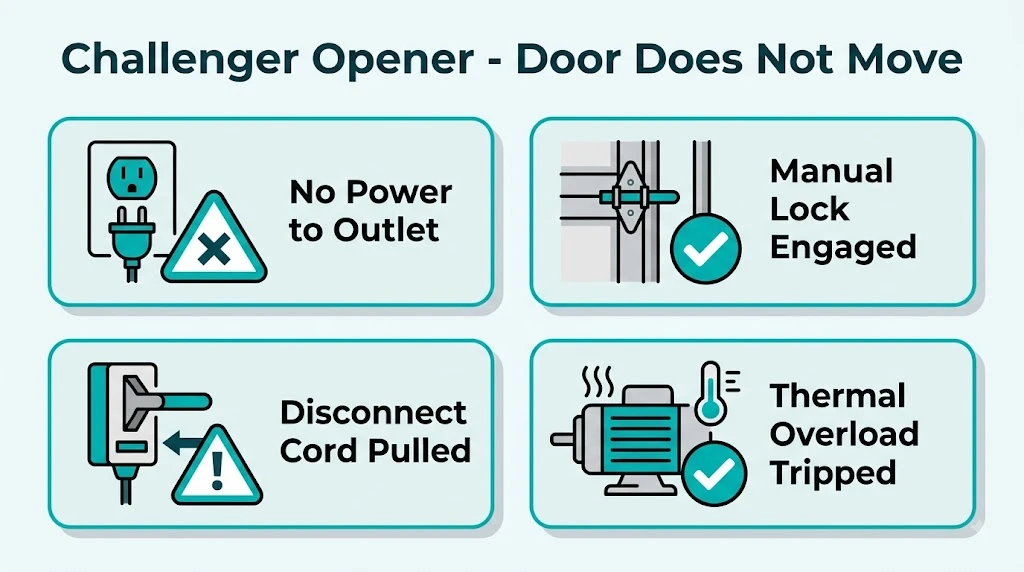
Problem: Door Does Not Move at All
| Check | What to Do |
|---|---|
| No power to outlet | Test the outlet with a phone charger. Check the circuit breaker and any wall switch controlling the garage outlet. |
| Manual lock engaged | Look for a slide lock bar on the door or a lock button on the wall panel. Disable it before operating the opener. |
| Disconnect cord pulled | A red cord hangs from the trolley. If someone pulled it to manually open the door, reconnect the trolley to the drive before using the opener. |
| Thermal overload tripped | If the opener ran repeatedly in quick succession, the motor may have tripped its thermal protector. Wait 15 minutes for the motor to cool, then try again. |
Problem: Remote Does Not Work
This is the most common Challenger complaint. Work through these checks in order before assuming the receiver is faulty.
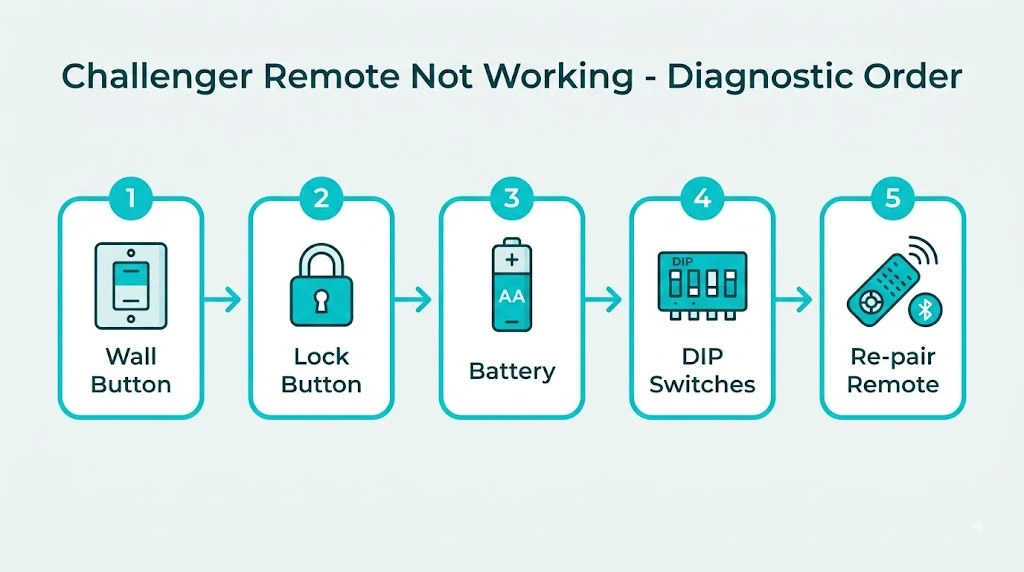
Step 1 — Check the wall button
Press the wall button inside the garage. If the door moves with the wall button but not the remote, the problem is the remote — not the opener. If neither works, the problem is the opener or power supply.
Step 2 — Check the wall panel lock button
The Challenger wall panel has a lock function. When lock mode is enabled, all remotes are disabled and only the wall button works. Look for a key icon or a lock label on the wall panel. Press it to toggle lock mode off.
Step 3 — Replace the remote battery
Remote batteries last 2 to 5 years depending on use. A weak battery causes short range before total failure. Replace with a fresh battery of the same type. Most Challenger remotes use a 12V A23 or 3V CR2032 battery. After replacing, stand within 5 feet of the opener and test.
Step 4 — Check the radio coding switches
Older Challenger models use DIP switches for radio coding — a row of small toggle switches inside both the remote and the motor unit receiver. If these do not match, the remote will not work. Open the remote battery compartment and check whether it has DIP switches. If it does, compare them to the switches on the motor unit receiver panel. Every switch must be in the identical up or down position.
Step 5 — Re-pair the remote (modern models)
On newer Challenger models with a Learn button: press and release the Learn button on the motor unit. The red LED turns on. Within 30 seconds, press the remote button you want to program and hold it until the LED blinks twice. Test the remote. If the LED turned on but blinked rapidly instead of twice, the memory is full — erase all stored remotes first by holding the Learn button for 10 seconds until the LED turns off.
Problem: Door Opens or Closes by Itself
A door that moves on its own is nearly always a wiring or radio interference issue. Work through these checks:
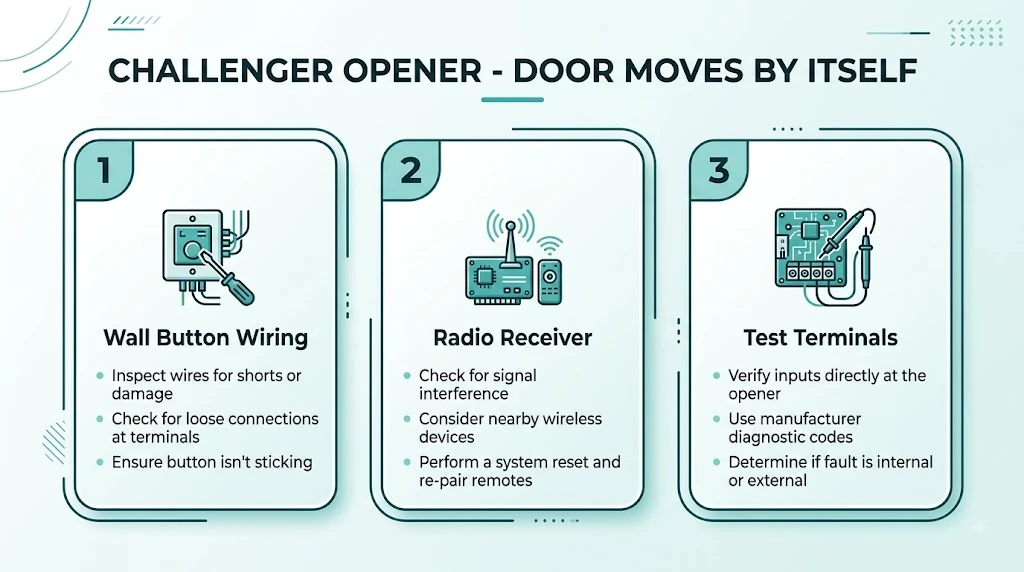
- Disconnect the wall button wires from the motor unit terminal. If the self-activation stops, the wall button or its wiring is shorted. Replace the wall button or rewire the run.
- Look at the motor unit back panel. Find the terminal with the radio receiver. Unplug the receiver. If the door stops activating on its own, the receiver is picking up interference from a nearby radio source — a neighbor’s remote on the same frequency. Re-code the system.
- Connect terminals 1 and 2 momentarily with a short test wire. If the opener activates, the wiring circuit is intact and the problem is confirmed as a radio or push button short.
Problem: Door Reverses Before Fully Closing
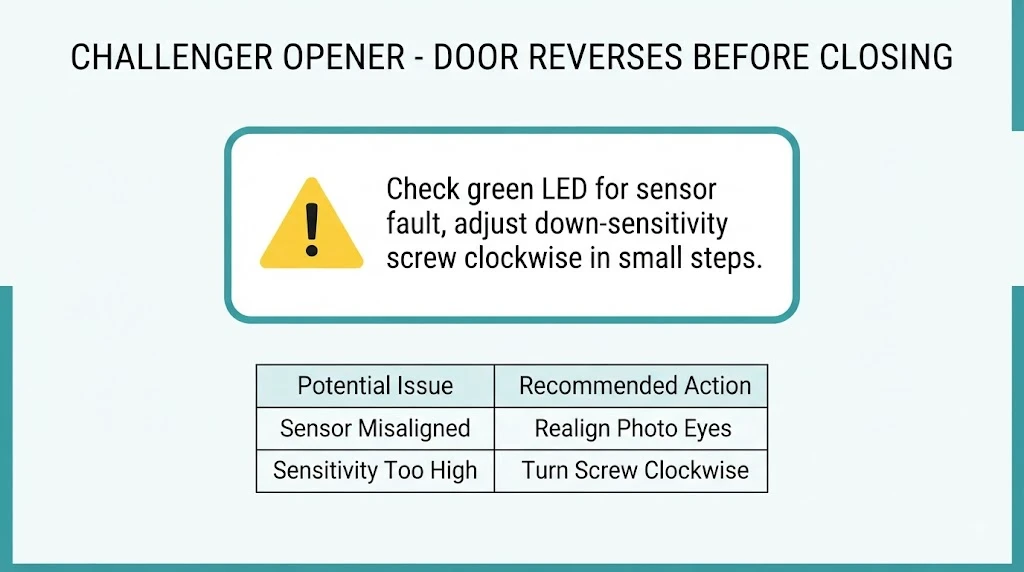
When the door reverses before touching the floor, the cause is almost always one of three things: sensor obstruction, sensor misalignment, or a down-travel sensitivity setting that is too sensitive.
| Cause | LED Signal | Fix |
|---|---|---|
| Sensor beam broken or blocked | Green LED fast flashing | Remove obstruction from beam path, clean sensor lenses |
| Sensor misalignment | Green LED fast flashing | Loosen sensor wing nut, pivot until LED turns solid, retighten |
| Down sensitivity too high | Red LED fast flash on reverse | Turn down-sensitivity adjustment screw clockwise slightly |
| Door binding on track | Red LED fast flash on reverse | Inspect track for debris or bent sections, lubricate rollers |
The Challenger 9300 series has separate up and down sensitivity adjustment screws on the back panel. Turning the down-sensitivity screw clockwise reduces how easily the door reverses. Make quarter-turn adjustments only and test after each one. After adjustment, always place a 2×4 flat on the floor and close the door — it must reverse on contact per UL 325 safety standards.
Door reverses too easily, even without a real obstruction
Door closes fully, reverses only on real contact per UL 325
Problem: Defective Motor Control Board
A faulty logic board is the last thing to replace, not the first. It is also the most expensive fix. The board is genuinely faulty only if every other check has passed. Signs of a failed board include: the opener light does not come on when the door moves, the red LED is slow-flashing (stuck relay) after a power cycle, or the opener activates randomly with no remote or wall button input after all wiring is confirmed good.
Challenger motor control boards are made by E.T. Systems, a South African company founded in 1989. Replacement boards can be sourced through authorized Challenger distributors. If a board is not available, the opener motor and hardware can be retained while replacing only the control head with a compatible unit. A professional assessment is recommended before purchasing a board.
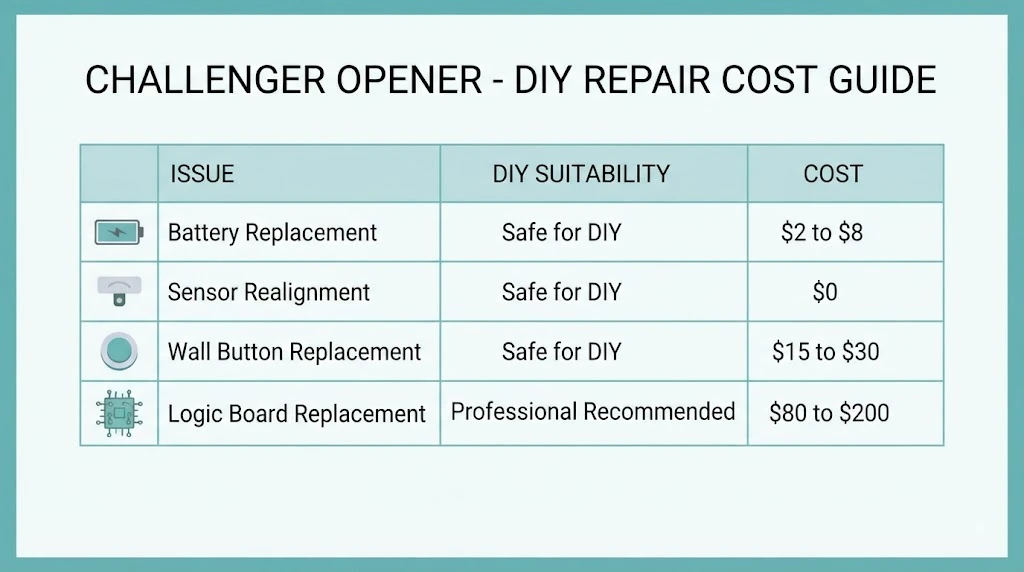
| Issue | DIY Suitability | Safety Risk | Cost | Time |
|---|---|---|---|---|
| Battery replacement | Safe for DIY | Low | $2 to $8 | 2 min |
| Sensor realignment | Safe for DIY | Low | $0 | 5 min |
| Wall button replacement | Safe for DIY | Low | $15 to $30 | 15 min |
| DIP switch re-coding | Safe for DIY | Low | $0 | 10 min |
| Travel limit adjustment | Safe for DIY | Low | $0 | 10 min |
| Logic board replacement | Professional recommended | Medium | $80 to $200 | 1 hour |
For sensor-specific issues, see our guide on garage door sensor blinking red — the alignment and obstruction fixes apply to Challenger sensors as well. If the opener is tripping the GFCI outlet, see our guide on garage door opener tripping GFCI for wiring and moisture causes.
Related Guides
For other brand-specific guides, see Meross Garage Door Opener Troubleshooting, Haas vs Clopay Garage Doors and EZ Lift Garage Door Opener Model 500.
For official manufacturer guidance, see the Door and Access Systems Manufacturers Association (DASMA).
Frequently Asked Questions
Who makes Challenger garage door openers?
Challenger garage door openers are made by E.T. Systems, a South African company established in 1989. They design and manufacture electronic security systems and gate automation products. Challenger openers are more common in South Africa and some international markets than in the US.
Where is the Learn button on a Challenger garage door opener?
The Learn button on a Challenger opener is located near the top of the antenna wire on the motor unit, typically on the back panel. It is usually identified by the red LED next to it. On older DIP switch models, there is no Learn button — programming is done by matching the toggle switches inside the remote and motor unit.
How do I reset a Challenger garage door opener?
To reset all stored remotes, press and hold the Learn button on the motor unit for 10 seconds until the red LED turns off. This erases all paired remotes. To reset travel limits, locate the up and down adjustment screws on the back panel and return them to the factory position marked in the manual. For a full power reset, unplug the opener for 30 seconds.
Why does my Challenger garage door reverse before closing?
The most common causes are a blocked or misaligned safety sensor, or a down-sensitivity setting that is too high. Check the green LED on the motor unit — if it is fast flashing, fix the sensor first. If the LED is not flashing, adjust the down-sensitivity screw on the back panel clockwise by quarter turns until the door closes fully.
Can I connect a Challenger opener to HomeLink in my car?
It depends on the model. Newer Challenger openers with rolling-code technology (Learn button models) may support HomeLink if the frequency matches. Older DIP switch Challenger models are not compatible with HomeLink. Check your opener’s frequency and the HomeLink compatibility list in your vehicle manual before attempting to pair.
My Challenger opener runs but the door does not move. What is wrong?
The most likely cause is a disconnected trolley. A red emergency release cord hangs from the trolley carriage. If someone pulled it to manually operate the door, the trolley is now disconnected from the drive chain or belt. Pull the cord toward the opener (not down) to re-engage the trolley, then test the opener.